How to make an auto sugar cane farm
Best Biomes
The Overworld
The player first spawns in the Overworld where resources such as wood, food, and stone are plentiful in most biomes. However, certain biomes have other negative things in them, making them harder to survive in.
Forest
Forests and Birch Forests are very common biomes, likely to be where you spawn in. As a rather basic biome, living in or near one is recommended for new players. Dark Forests should be considered as a more extreme version of the normal Forest that happens to contain the coveted Woodland Mansions.
Pros:
- Many trees provide a large amount of wood
- Animals are plentiful
- Wolves spawn in the normal variant, providing an animal to tame
- Generally temperate, giving equal access to more varied biomes
- Varied flowers generate, especially in the Flower Forest variant
- Beehives spawn on trees rarely
- Trail Ruins spawn in the Old Growth Birch Forest variant
Cons:
- Trees can make it hard to traverse, especially for the normal variant
- Lack of any surface structures and repetitive generating makes it easy to get lost in
- Trees provide shade for mobs to hide under during the day
- Land requires clearing to make way for structures
- Dark forests have overall thicker trees, meaning all of the above problems are worsened by living in one
Plains
Plains, along with Meadows are common biomes characterized by grassy, flat terrain and plentiful Bees. It’s highly recommended to live here for many reasons. The Savanna can be seen as a variant of the plains biome that has llamas and more trees at the cost of being hotter.
Pros:
- Flat terrain allows high visibility, easy navigation and easier building
- Beehives are found often, especially in Meadows
- Wide variety of Flowers, rarer ones spawning in mass in Meadows
- Animals are plentiful here
- Villages generate commonly, providing massive amounts of food and access to invaluable Villagers within
- Large spaces of land to farm easily, and is often surrounded by water, making farming and fishing easier
Cons:
- Grass may block attacks while in combat
- Nights have many mobs due to the lack of trees
- Many resources have to be imported from different regions due to the lack of variety
Taiga
Taigas and their Old Growth Taiga Variants provide a similar yet distinct experience from normal Forests. This is the way to go if you’re looking for a different kind of play.
Pros:
- Spruce Trees aren’t nearly as movement-inhibiting as the trees in Forests, along with giving unfathomable amounts of wood if placed in a 2 by 2 formation
- Sweet Berries spawn here, providing a weak, yet plentiful Food
- Villages generate in the normal variant, often generating with Iron Armor for the taking
- Grass color is unique, which is often desirable
- The Old Growth variants always generate with Lush Caves below them
- This also means Azalea trees are easy to get
- This is one of the only biomes where Foxes spawn, along with its similar snowy variant
Cons:
- Like the forest, it’s still rather hard to traverse and requires flattening to use.
- Due to it being a cold biome, warmer biomes such as Deserts and Jungles are further than usual
- If you aren’t careful, you might accidentally walk into a Sweet Berry Bush
- Trees are often too tall to cut without placing more blocks.
- The giant trees can be cut easily by digging a staircase up the middle and destroying the staircase on the way down, but still poses a risk of falling off and taking fatal Damage.
Jungle
Jungles and their variants from a glance might seem to be one of the best places to live. However, many factors add up for it to be an unpleasant experience to those who try, mostly pertaining to the foliage.
Pros:
- Many varied resources nearly are exclusively found here, such as Bamboo and Cocoa Beans.
- Tons of wood can be found everywhere here
- Jungle pyramids can be found here, providing shelter and decent loot.
- Ocelots and Parrots can be found here
- The lime grass color is highly desirable to most
- Warmer biomes such as Deserts and Badlands are closer by
Cons:
- The foliage is too dense for any constructions to be made in a timely manner
- Fires are a legitimate issue due to this, compared to most biomes where it can be ignored safely
- Traveling is hard due to the varied terrain and high foliage
- Mobs can easily be found roaming during the day
- Deep caves can be covered up by the foliage until it’s too late
- Due to it being a warm biome, colder areas are disproportionally farther away.
Snowy Biomes
On cold extreme, the Snowy Plains and other associated biomes like the Ice Spikes might surprise some with their difficulties. Since temperature for the most part isn’t a problem, this biome plays out very similar to the plains and taiga. Due to this many of the downsides will not be listed as it’s the same as the aforementioned biomes.
Pros:
- One of the few places where Polar Bears spawn, providing emergency food or something simple for mob collectors
- Water can be frozen into Ice renewably here, while Snow and Powder Snow can be farmed here too
- Rivers are frozen over, making boats travel much faster on them
- Villages can spawn here, their cold version containing more wood in the buildings and some unique architecture.
- Igloos spawn, allowing players to set up villages to be
Cons:
- Since it’s as cold as can be here, warm biomes are usually unreasonably far away
- The snow often requires builds to be covered in String or will constantly be snowed on
- Since water will be frozen, all open water has to be covered or it will become ice
- Animals are scarce, often requiring them to be imported or have other food sources such as from Farms
Deserts
Deserts and Badlands are the other temperature extreme, often being barren, flat and seemingly inhospitable. With proper skill and adequate preparation, it can lead to a thriving base for those who can tough out some of the downsides.
Pros:
- Tons of Sand and Sandstone be found everywhere, a necessary resource for Glass
- Badlands are the best place for Terracotta, a building block that has a wide variety of uses
- Red Sand can only be found naturally in Badlands, giving another reason to go there
- The same goes with Cactus for both biomes
- The flat terrain and soft ground make flattening land and building various constructions a very easy task
- Thunderstorms do not make lightning here, turning them into unscheduled nights in these biomes.
- Although, that does make getting Heads and Skeleton Horses impossible without getting them elsewhere
- Desert pyramids, Desert Wells and Villages generate here, with the last one coming with Camels
- Badlands have high amounts of Gold Ore and Mineshaft that generate on the surface
Cons:
- No trees generated except on the edges of Rivers and the tops of some Badlands Plateaus
- No animals except Rabbits spawn
- No grass is generated outside of the Rivers running through them
- The Badlands can have treacherous terrain to traverse at times
- The grass is a sickly yellow in the desert and olive green in the Badlands, both not looking the healthiest
- Incredibly far away from the cold biomes one may need
- Villages don’t have many valuable resources to survive
- Some are very big
Oceans
While these biomes aren’t considered often, Oceans aren’t bad places to live, just requiring some extra precautions before settling down.
Pros:
- Shipwrecks, Ocean Ruins, Ocean Monuments, and Buried Treasure are all structures that generate here and give great amounts of loot
- Since all structures have to be above water, drained or habitable, the terrain below doesn’t matter for the most part, giving a perfectly flat expanse to build on.
- Fish spawn constantly, acting as an easily obtainable source of food
- Only Drowned can spawn to attack you, with everything else being neutral or Guardians that only spawn in one structure
- Fall damage is nowhere near as dangerous due to the fact water negates it, making building tall structures easier
- Water movement is faster than land movement, making them act as a crossroads of sorts.
- Many items such as Coral or Prismarine can only be gotten here
Cons:
- Dry land nearly always has to be built by the player excluding Frozen Oceans
- Drowned armed with Tridents pose a great threat for those not inside a structure
- Drowning poses a massive threat for those working in the area
- Aimless sailing can get somebody afflicted with Mining Fatigue, a debilitating Effect that prevents anything more than a couple blocks worth of mining to be done
- Gathering materials such as ores is difficult due to mining speed getting reduced when submerged in water
- Getting lost is easy since there is next to nothing to keep track of
Mountains
Even if they are painful to traverse, Mountains have many reasons to live in them. The view is often second to none and various treasures can be found within.
Pros:
- Mining the tops of mountains gives massive amounts of Iron Ingot, Coal and occasionally Emerald Ore
- This is best seen in Stony Peaks
- Powder Snow can be found easily in the snowy parts
- The view from high up is considered by many to be beautiful
- Trees from the Groves provide a good source of wood
- Cherry Groves provide beautiful flora and a unique wood type
Cons:
- The Deep Dark is often found below Mountains, inhibiting mining at the bottom of the world to the point that a mine might have to be located elsewhere
- The terrain is very dangerous, making long travel times and falling a large hazard
- Oceans may be hard to find nearby
- Flat terrain is very hard to come by near the peaks, making it very difficult to build constructions of a substantial size
Swamps
Swamps and its variant, the Mangrove Swamp are incredibly different biomes for survival, but both may be interesting to live in.
Pros:
- Normal swamps have trees and animals needed for survival, while the Mangrove Swamp has incredibly high amounts of trees
- Boats allow for faster transport within these biomes since the water encompasses a large portion of the biome
- Lily Pads and Blue Orchids are near exclusively found here
- The biomes are small enough to give access to things these biomes don’t do well themselves
- Frogs are exclusively found here
- Slimes spawn at night, giving easy access to Slimeballs at the small cost of a relatively easy enemy spawning
Cons:
- The water necessitates a boat be kept on hand at all times
- Mangrove Swamps have foliage too dense for practically anything to be done, even worse than a Jungle in that respect
- The grass color is a deep green and may be displeasing to some
The Nether
The Nether is a different dimension that is altogether more hostile and dangerous for survival, with powerful mobs, difficult terrain, and an ever-present danger of lava falls and lava oceans. However, it offers many valuable items not found in the Overworld, as well as a unique and challenging survival experience.
Pros as a whole:
- The Nether possesses countless unique resources such as Blaze Powder, Ghast Tears, and Magma Cream, many of which are instrumental in activities such as brewing Potions
- With enough effort, the Nether can be transformed into a canvas for a large amount of builds
- The bizarre scenery can be seen as appealing to some, especially when constructions are added to it
Cons as a whole:
- The majority of the Nether is filled with Lava, making it extremely difficult to traverse without ender pearls
- Lava can also suddenly appear when searching for materials such as Ancient Debris, which can bring your demise if you don’t react quick enough
- Hostile mobs such as Magma Cubes are abundant in the Nether, which make it possible to be decimated easily without adequate preparation
Warped Forest
The Warped Forest is the safest biome in the Nether, as only endermen and passive striders spawn here naturally. It is still possible to find a fortress or bastion remnant, both of which contain dangerous enemies.
Pros:
- The vegetation is an interesting blue-green, making this biome potentially appealing for building
- The high amount of endermen make this biome an ideal place to harvest ender pearls
- Warped fungi can be obtained in abundance, making avoiding hoglins and riding striders less challenging if ever necessary
- Plenty of wood can be obtained from huge fungi
Cons:
- Builds will need to be either lit or have ceilings lower than 3 blocks to prevent endermen from spawning inside
- No food can be found naturally in this biome, short of mushrooms for mushroom stew or hoglins in hoglin stable bastions for pork
- Huge fungi grow thickly in this biome and their tops do not decay when the stem is chopped down, unlike tree leaves, making clearing away the vegetation difficult
Nether Wastes
The Nether Wastes is one of the more barren biomes in the Nether, but is still considered relatively safe due to the open terrain and the fact that overwhelming numbers of hostile mobs do not spawn here. A wide variety of mobs spawn in this biome, including the ghast, magma cube, piglin, zombified piglin, enderman, and strider.
Pros:
- Flat open scenery makes for plentiful building opportunities
- Fewer hostile mobs spawn here, making this biome altogether safer
- Ghasts and magma cubes spawn in this biome and drop valuable potion ingredients
- Piglins spawn here and can be bartered with to obtain valuable loot
Cons:
- As with the warped forest, the only food in this biome can be obtained from mushrooms or the occasional hoglin stables
- This biome mostly consists of netherrack, making it fairly uninteresting
- Players will need to be careful about opening chests and mining nether gold ore or gold blocks, and wear at least one piece of golden armor to prevent piglin attacks
- Builds should have ceilings lower than 2 1⁄2 blocks to prevent magma cube spawns and be well-lit to prevent piglin spawns, and magma cube farms should be less than 5 x 4 x 5 blocks to prevent ghast spawns
- Iron doors are recommended for builds, as piglins can open wooden doors
- Ghasts can destroy builds made of weak materials such as dirt, wood, or netherrack, so stone buildings are recommended
Crimson Forest
The Crimson Forest is seen as the red counterpart to the warped forest. Piglins and hoglins spawn here in abundance along with the occasional zombified piglin, so this biome is generally regarded as one of the more dangerous biomes in the Nether.
Pros:
- Huge crimson fungi generate here, making this biome a reliable source of wood
- The vast numbers of hoglins make obtaining food fairly simple
- Plenty of piglins mean plenty of bartering opportunities for rare or valuable loot
Cons:
- As with the warped forest, the vegetation here is very thick, meaning it can be difficult to retreat if attacked or to clear away a space for building
- Piglins spawn here quite often, so anti-piglin safety measures are even more important
- This biome may be uninteresting to some due to its intense red color
- Large numbers of hoglins spawn here and are both annoying to fight and difficult to keep away without warped fungi
Soul Sand Valley
The Soul Sand Valley is a relatively open biome, but is regarded as dangerous. Due to the high amounts of ghasts and skeletons combined with soul sand slowing down anything that walks into it, this biome can be extremely difficult to survive in.
Pros:
- Soul sand can be found here in vast quantities, making this biome good for large nether wart farms
- The high amount of bone blocks means plenty of bone meal
- Ghast farms can be built in this biome, making it an excellent source of ghast tears
Cons:
- This biome is barren and generally devoid of food apart from mushrooms and hoglin stables
- The soul sand floor will slow players down and make it very difficult to travel or to avoid attacks without boots enchanted with soul speed
- Multiple ghasts and/or skeletons can easily overwhelm an unprepared player
Basalt Deltas
The Basalt Deltas are one of the most challenging biomes in the Nether due to its uneven terrain, frequent lava pools, and high numbers of magma cubes. Survival in one of these biomes is considered quite difficult and dangerous.
Pros:
- Basalt and blackstone generate frequently, making this biome a good source of unique building blocks
- Plenty of magma cubes mean magma cream for fire resistance potions
- The terrain is uniquely shaped and may be appealing for some
Cons:
- This biome is considered highly dangerous due to the numbers of magma cubes, occasional ghasts, frequent lava pools, and constant danger of falling
- Building is very difficult due to the uneven ground
- Fire resistance potions are almost a requirement due to the constant lava hazard
- No food can be found apart from mushrooms, as no bastions generate here
- The dull gray and black colors may make this biome even more unappealing
Crop Farming
Starting out
Each crop requires a seed for planting, and getting the first few can be non-trivial. After the first few seeds, or the first carrot or potato are planted, they eventually produce more seeds or vegetables than you started with. These can be used to replant, and plant more empty spots, until you’ve filled your farm. All four crops provide food for the player, and also to breed various farm animals. In addition to the sources listed below, all four crops can be found in village farms, and sometimes in village chests.
Players may want to set up a wheat farm early on, to provide bread as their first food supply; however, as the game progresses, better foods become available, and the wheat farm can be re-purposed for breeding animals. Carrots, potatoes, and beetroot are usually not found until somewhat later in the game.
- Wheat is grown from seeds, which can be collected by destroying grass. Each grass plant has only a 1⁄8 chance of dropping seeds, grass is common in most biomes, so gathering seeds is fairly easy. Harvesting a mature wheat plant yields 1 piece of wheat and 1-4 seeds. If harvested early, they drop a single seed, but no wheat. The wheat items can be crafted into bread, or combined with other items to make cake, or cookies. The wheat itself can’t be planted.
- Beetroots are similarly grown from beetroot seeds, each plant yielding one beetroot and 1-4 seeds. The seeds can be found as chest loot. With a crafting table and a bowl, beetroots can be crafted into Beetroot Soup, a more filling (but non-stackable) food item. Beetroots can also be crafted into red dye. As with wheat, Beetroot items cannot be planted.
- Carrots and potatoes are their own seed, which is planted directly to grow more of the same. Killed zombies occasionally drop a single carrot or potato (which you can cultivate and multiply into a farm’s worth). Each mature plant can be harvested to get 1-4 potatoes or carrots respectively. (A potato plant also has an additional 2% chance of dropping a useless poisonous potato.) Both carrots and potatoes can be eaten directly, but can also be improved:
- Potatoes can also be cooked into baked potatoes for more nutrition.
- Given some gold, carrots can be crafted into golden carrots, one of the best foods in the game.
Crops can also be used to lure and breed various farm animals: Wheat for cows and sheep (or the rare mooshrooms), seeds (any kind) for chickens, and any of carrots, (raw) potatoes or beetroots for pigs. Carrots (or dandelions) can also be used for rabbits.
Sowing
These crops can only be planted on farmland, which is produced by using a hoe on dirt or grass blocks. If there is no water nearby, farmland dries out and reverts to dirt, but only if there is no crop yet planted on it. The water can be a “still” source block, or flowing, but either needs to be within four blocks of the farmland horizontally, on the same vertical level or one level above. If farmland becomes completely dry and a crop is planted on it, the farmland does not revert to dirt. Thus, it is possible to grow crops without water (say, in the Nether) by hoeing the dirt and immediately planting a crop. The farmland does not revert until after the crop is harvested, and even so that can generally be avoided by immediately replanting. Note, however, that this “dry farming” makes crops grow slowly.
At the beginning of the game when buckets are not available, you can till the dirt at the edge of a pond or lake or river, perhaps digging a trench to extend the water supply inland or straightening the shoreline by adding or removing dirt blocks at the top layer of the water’s edge. However, once the player has a comfortable amount of resources, setting up some fenced farm plots prevents mobs from trampling the crops and attacking the farmer.
A basic repeatable farm plot consists of a 9×9 square of farmland with the center square dug out and filled with a water source block. This gives 80 blocks of farmland which can be fenced with 40 pieces of fence including gates and is the most efficient arrangement for simple farms. For larger farms, this plot can be repeated in both the X and Z directions.
Leaving the water source uncovered poses a risk of falling into it and then trampling some of the farmland when jumping out of it. The water can be covered with any block, but using a slab, carpet, lily pad, or other block that can be walked onto without jumping is better to prevent trampling. In modern versions of the game, you can also place a slab in the water block, providing a walkable surface with the farmland. In cold biomes, covering the water with a solid block also guards it against freezing. An alternative that also provides light so some crops can continue to grow at night is to suspend a block above the water with one space of air between them—so you can neither fall into the water nor jump on and off the block—and place torches on that block (or use a jack o’lantern or glowstone as the block).
Placing torches or other light sources near the crops allows them to continue growing at night or underground, and it prevents hostile mobs from spawning near them. Planting crops in alternate rows (that is, rows separated by bare farmland or a different crop) speeds up growth as well.
Growth and harvesting
Growing conditions

This section needs to be updated.
Please update this section to reflect recent updates or newly available information.
Reason: Need to ensure light level conditions are up to date. Crops can grow at night in recent versions, even without block light.
Any of wheat, carrots, beetroots and/or potatoes grow only under the following conditions:
- It is directly above a block of farmland. If the farmland is removed or reverts to dirt, the crop breaks.
- A light level of 9 or higher at the plant. This doesn’t have to be sunlight, so torches let crops grow at night or underground.
- The chunk the crop is in is receiving chunk ticks, on Bedrock Edition this only requires that the chunk is loaded, while on Java Edition the chunk also has to be within 128 blocks of the nearest player.
In single-player or in multiplayer with only one player nearby, crops do not grow faster while the player is sleeping. However, if torches are not being used, sleeping skips past the nights when the crops would not grow.
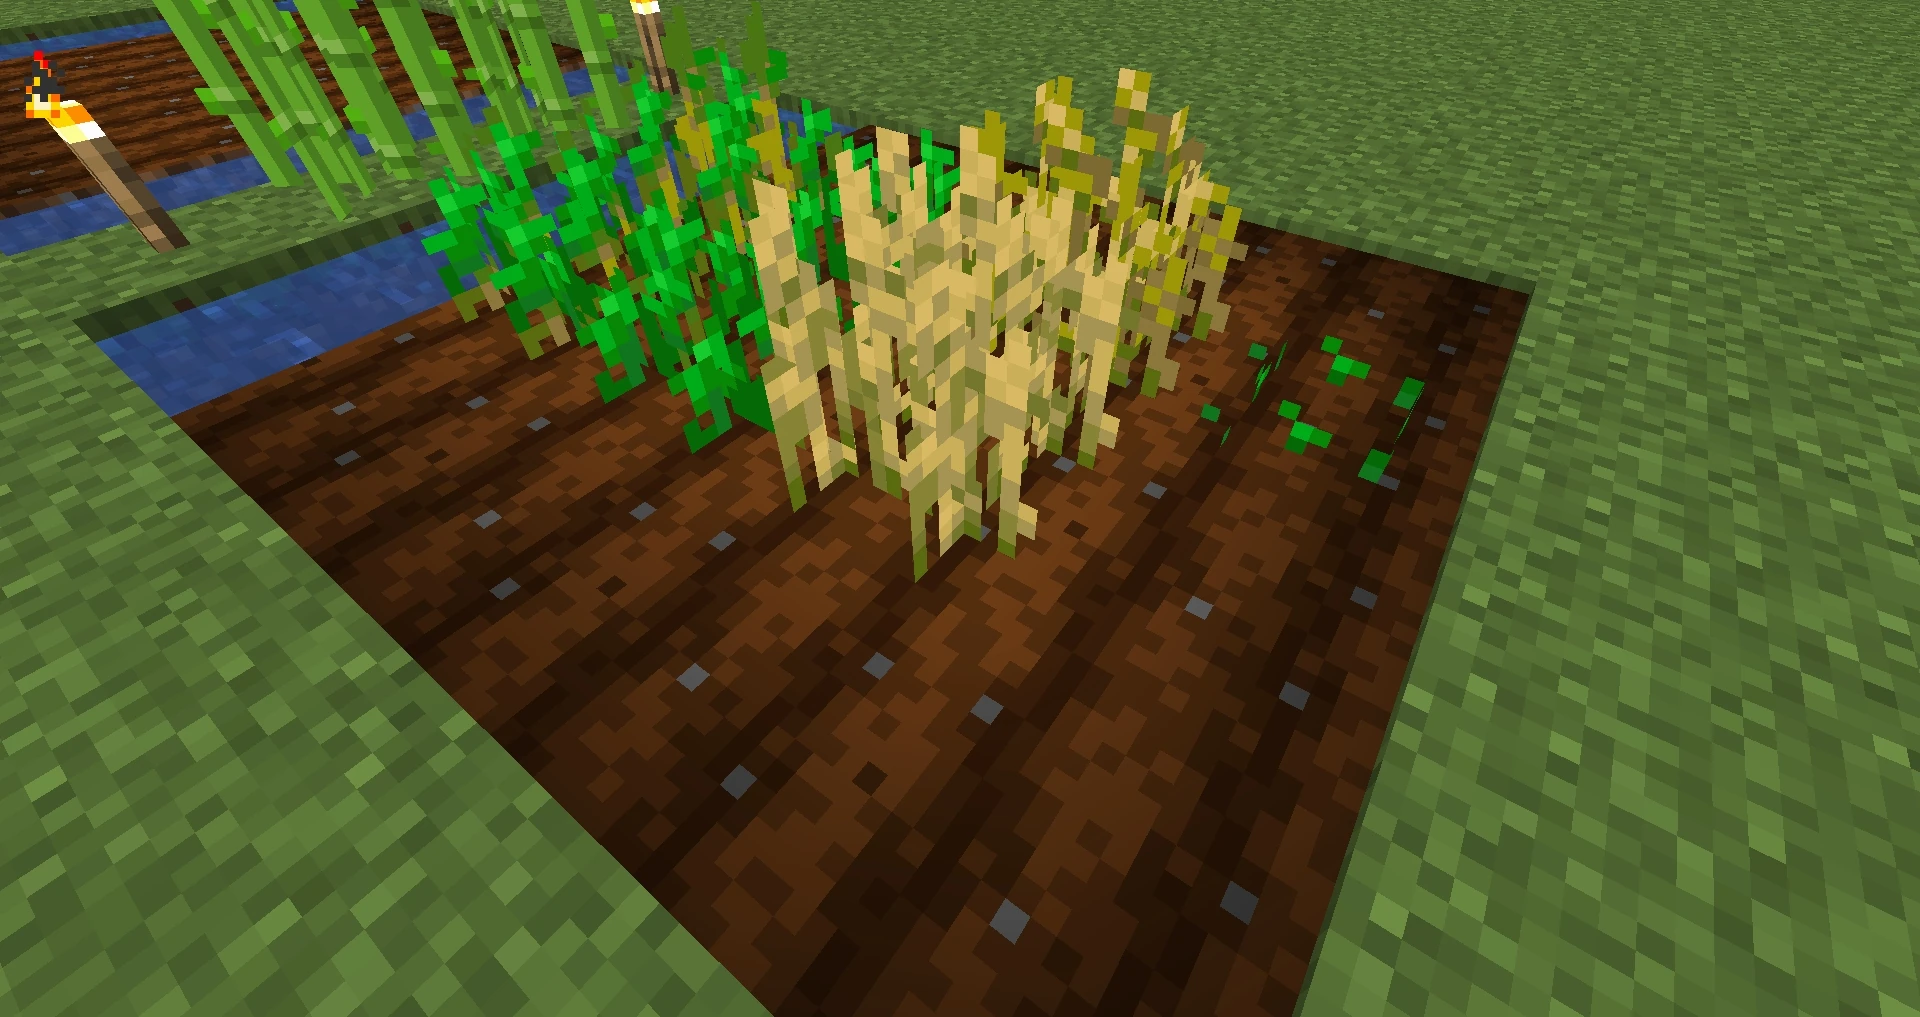
Wheat, carrots and potatoes have a total of 8 growth stages. Beetroot has 4 growth stages. For wheat, each stage is a little taller and darker than the last, and the crop is mature when the wheat turns brown. Carrots and potatoes have only 4 distinct appearances—each pair of stages appears identical except that stage 7 shares the appearance of stages 5-6 (so the player can tell if it’s fully mature or not, otherwise the fully mature and its previous stage can confuse the player). When mature (stage 8 for carrots and potatoes, stage 4 for beetroots), carrots and beetroots show bright crops protruding from the ground, while on a potato plant, the leaves appear significantly taller than in previous stages.
Growth happens at random intervals and is affected by growing conditions. The average duration of each stage ranges from 5 minutes (in ideal conditions) to 35 minutes (in worst-case conditions). Aside from being placed on hydrated farmland, “ideal conditions” include having light sources (for night growth) and planting crops in alternate rows: each row of plants should be next to either a different crop or empty farmland. For the plants on the edges of the plot, it’s also ideal to have more farmland beyond the row ends and the outer rows; however, this is rarely done since it amounts to leaving the edges of the available field empty. Full details of the growth mechanics are given below.
Accelerating growth
Using Bone Meal on any crop plant has a chance to advance it a random number of growing stages, allowing you to harvest it faster.
Bees can be used to accelerate the growth of crops by pollinating them. After collecting pollen from flowers, bees visually drop pollen particles as they make their way back to their hive or nest. If these particles land on a crop, the crop advances one growth stage. Each bee can pollinate up to 10 crops per trip. Players can utilize this behavior by placing their crops between beehives and flowers to maximize crop pollen exposure. For more details, see Bee § Pollinating.
Harvesting


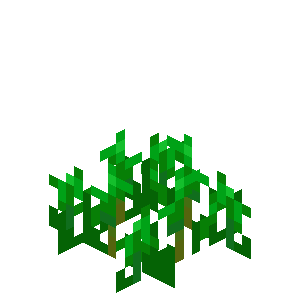
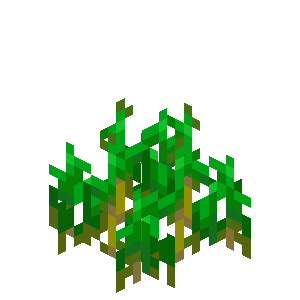
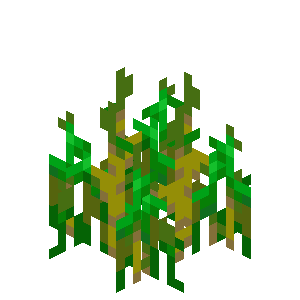
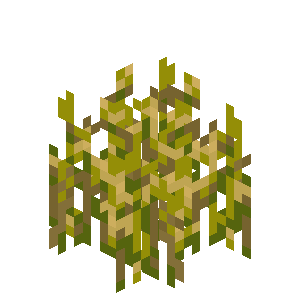
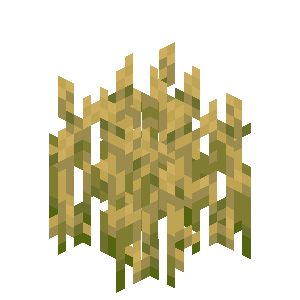
Crop stages.
Crops can be harvested at any time by left-clicking on them with or without a tool, but when immature, they yield only one of the corresponding seed item. When mature, wheat yields 0-3 seeds and one item of wheat. Carrots and potatoes yield 1-4 of the crop when mature. Mature potato plants have a 2% chance of dropping a poisonous potato in addition to the normal potatoes. Beetroots drop 0-3 seeds and 1 beetroot.
Because harvesting one block at a time can become very tedious, methods for automatically harvesting fields have been developed. The most common tactic is to flood the field with water (which harvests all the plants it touches), but other methods are possible as discussed below.
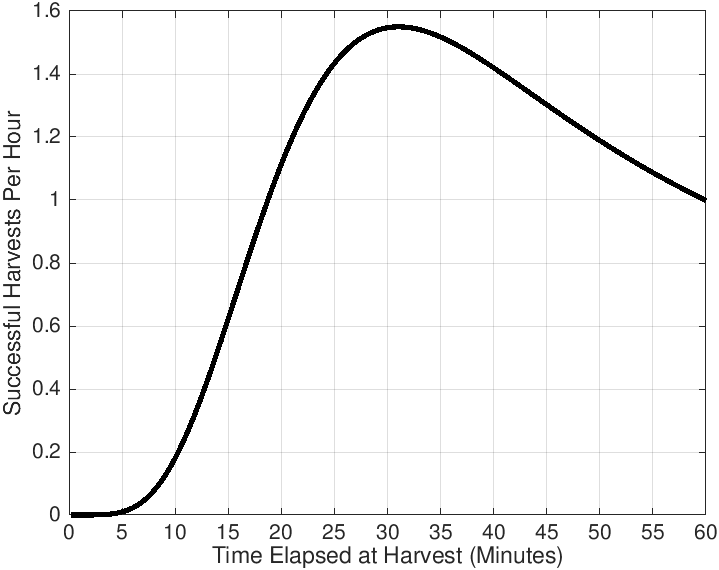
Growth rate
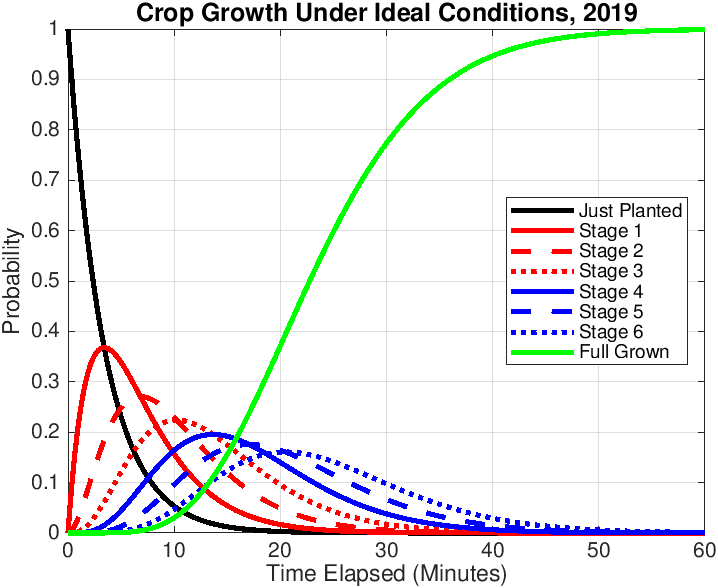
The progression of crops over time is shown in the plot to the right. Each line represents the probability of finding a given crop in that particular growth stage, assuming ideal conditions. The plots for non-ideal conditions look similar with only the scale of the x-axis (time passed) being longer.
Early in the game it may be helpful to maximize the growth rate of a crop in order to quickly multiply the seeds and/or get some wheat quickly. Doing so requires some understanding of the growth mechanics which are discussed here.
Crop growth is prompted by random ticks—the same random events that, for example, causes Zombified Piglins to appear in Nether portals. For a given block, a random update occurs an average of once every 68.27 seconds in Java Edition, or once every 204.8 seconds in Bedrock Edition. However, the delay can vary widely, and it is rare, but possible for plants to gain a stage the moment after planting or grow two stages a moment apart.
| Surrounding farmland | Probability of crop per random tick (hydrated farmland) | Probability of crop per random tick (dehydrated farmland) |
|---|---|---|
| 0 | 14.29% | 7.69% |
| 1 | 16.67% | 8.33% |
| 2 | 20.00% | 9.09% |
| 3 | 20.00% | 10.00% |
| 4 | 25.00% | 11.11% |
| 5 | 25.00% | 12.50% |
| 6 | 33.33% | 12.50% |
| 7 | 33.33% | 14.29% |
| 8 | 33.33% | 14.29% |
During every update, a crop plant gets a chance to grow to the next stage with the exact chance depending on conditions:
- As noted above, growth requires a light level of at least 9 in the block above the plant.
- The growth probability is
1/(floor(25/points) + 1), where “points” is as follows:- The farmland block the crop is planted on gives 2 points if dry or 4 if hydrated.
- For each of the 8 blocks around the block on which the crop is planted, dry farmland gives 0.25 points, and hydrated farmland gives 0.75.
- Note that if a field is bordered with anything besides more farmland, the plants at the edge grow more slowly.
- Having a crop of the same type diagonally from another of the same type will halve the growth rates of both crops. This does not stack.
If any plants of the same type are growing in the eight surrounding blocks, the point total is cut in half, unless the crops are arranged in rows. That is, having the same sort of plant either on a diagonal or in both north-south and east-west directions cuts the growth chance, but having the same type of plant only north-south or east-west does not. The growth chance is only halved once no matter how many plants surround the central one.
From this we can figure the growth periods for the common cases:
- For the fastest growth per seed, a full layer of hydrated farmland with crops in rows is ideal. Under these conditions, the probability of growth during each update is 1⁄3, or approximately 33%. Most (4⁄5) planted crops reach maturity within 31 minutes (about 1.5 minecraft days). In fact, 31 minutes is very close to the ideal time at which to harvest if an auto-farming system is set to a timer, precisely 31 minutes and 3.14 seconds. For all plants to have this probability, crop rows must be separated by empty farmland or by a different crop, and the edges and corners of the field must be empty farmland. However, this probability also applies to crops adjacent to one or two non-farmland blocks (e.g. blocks of water in the middle of a field for hydration and/or a torch) due to the
floorfunction.
- For hydrated crops in rows at the edge of a field (having 3 blocks of non-farmland along one side), the growth probability is 1⁄4 (25%). Most planted crops in this case reach maturity within 41 minutes (about 2 minecraft days). [verify]
- For hydrated crops in rows at the corner of a field (having 5 blocks of non-farmland adjacent), the growth probability is 1⁄5 (20%). Most crops reach maturity within 52 minutes (about 2.5 minecraft days). [verify]
- Hydrated crops not in rows have approximately half the growth probabilities: 1⁄6 (16.7%) for mid-field plants, 1⁄7 (14%) for edges, and 1⁄9 (11%) for corners.
- The usual worst-case conditions for growing are crops placed out of rows on dry farmland. In this case, the growth probability is 1⁄13 (approximately 8%) for the middle crops, 1⁄16 (6%) for the edges, and 1⁄19 (5%) for the corners.
- The worst case would be two crops diagonally adjacent on dry farmland (all other surrounding blocks being non-farmland) which has a growth probability of 1⁄23, about 4%.
- The average rate of production per wheat crop can be found by the expression (6.591 x Growth Probability) wheat per hour, assuming the crops are harvested as soon as they are fully mature.
Later in the game, the highest yield per area of a given field may be more important than the fastest growth per seed. Fields sown solidly to achieve this with a single crop do grow at half the speed, but they also let you separate each type of crop into its own respective field and harvest one type all at once. However, one large field with alternating rows of different crops would still grow faster than smaller fields each sown solidly with a single crop.
| Sides to grow to | Surrounding farmland | Probability of fruit per random tick, (hydrated farmland) | Probability of fruit per random tick, (dehydrated farmland) |
|---|---|---|---|
| 1 | 0 | 3.57% | 1.92% |
| 1 | 4.17% | 2.08% | |
| 2 | 5.00% | 2.27% | |
| 3 | 5.00% | 2.50% | |
| 4 | 6.25% | 2.78% | |
| 5 | 6.25% | 3.13% | |
| 6 | 8.33% | 3.13% | |
| 7 | 8.33% | 3.57% | |
| 2 | 0 | 7.14% | 3.85% |
| 1 | 8.33% | 4.17% | |
| 2 | 10.00% | 4.55% | |
| 3 | 10.00% | 5.00% | |
| 4 | 12.50% | 5.56% | |
| 5 | 12.50% | 6.25% | |
| 6 | 16.67% | 6.25% | |
| 3 | 0 | 10.71% | 5.77% |
| 1 | 12.50% | 6.25% | |
| 2 | 15.00% | 6.82% | |
| 3 | 15.00% | 7.50% | |
| 4 | 18.75% | 8.33% | |
| 5 | 18.75% | 9.38% | |
| 4 | 0 | 14.29% | 7.69% |
| 1 | 16.67% | 8.33% | |
| 2 | 20.00% | 9.09% | |
| 3 | 20.00% | 10.00% | |
| 4 | 25.00% | 11.11% |
Farm designs
Classic farm
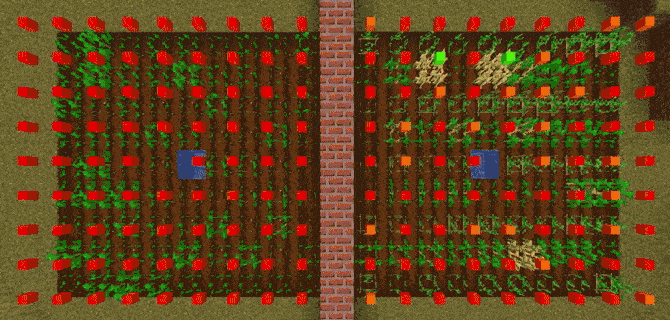
The basic farm plot is a 9×9 plot of farmland with the center block replaced by water (often surrounded by fences, making it 11×11). This basic plot can be used for wheat, beetroots, carrots, or potatoes, or even for pumpkins and/or melons. As described above, it may be planted solidly, or in alternating rows for fastest total yield per area. For night growth, light may be suspended above the water block and placed around the edges. The central water hole can be covered with a bottom-slab, to avoid falling in; in recent versions, a top-slab can be placed in the water hole (that is, a waterlogged slab), for a flat surface.
The field can be harvested quickly by simply dumping a bucket of water over the center, washing all the crops up against the fence.
This design may be easily extended in both the X and Z directions. If lighting the field for night growth, additional lights is needed (again they may be suspended in the air) where the corners of the basic plots meet.
To farm multiple crops in a single field’s footprint, you can stack the fields making a vertical farm. One complication here is that a block is needed to hold the water on each level. A Jack o’Lantern can be used to both hold up the water and provide central lighting, or any block can have torches placed on it. The fields can be stacked with two-block or three-block spacing. Harvesting can be easily done by using a water bucket on the bottom of the lighting block (three block spacing) or the top of the waterlogged slab (two-block spacing, but must manually break the corner plants). Alternatively, you can irrigate all levels with a waterfall through the (empty) center block spaces. and provide lighting elsewhere.
Semi-automatic harvesting
The next extension of that idea is to provide a touch of automation. Expanding the field to 9×10 (with two water blocks in the middle) and stacking the fields with two-block spacing allows automating the harvest, with a double central column between the water blocks: Two jack-o-lanterns on the bottom, and two outward-facing dispensers on top , each loaded with a water bucket. The dispensers also support the water above; note that with just one central column and a 9 by 9 block farm, a single water dispenser wouldn’t be able to reach all the crops. The dispensers can be triggered with buttons or tripwires; either way, they need to be on top to avoid displacing some crops with the button or hook. Adding plot borders with fences, a stairway along one edge, and four layers expands the whole system to 12×12×12. Some notes on this scheme:
- Alternating rows of different crops still speeds growth, but as noted above, speed may not be a priority at this point. Planting the crops solidly on separate levels is more convenient for harvesting what you need at a given moment, and they can grow while you do other stuff.
- The water dispensers do not harvest melons or pumpkins, but may instead destroy their stems. Accordingly, the dispensers on the melon/pumpkin level(s) can be unloaded, replaced with other blocks, or (on the top level) skipped entirely.
Instead of going for a 9×10 expansion, it is also possible to stay in the 9×9 field (11×11 fenced) footprint by adding four water dispensers on the four corners of the fence. This variation takes more dispensers to make, but all products fall into the water hole for easy collection. When you make the farm vertical, a sign can be used to contain the water while allowing the items to fall through to the bottom layer, where a hopper may lie.
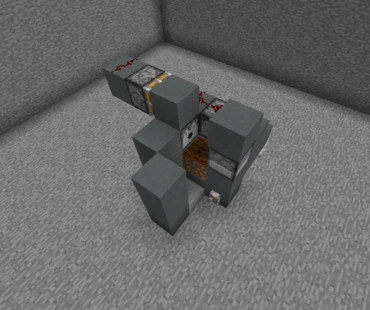
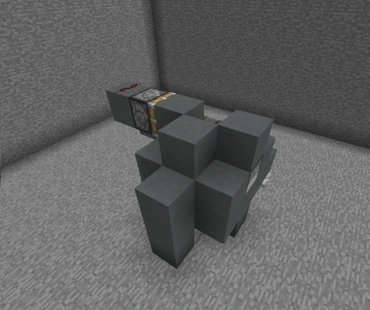
Micro farms
Micro / Nano farms are useful when space is limited. They grow the crops by firing bonemeal at them from a dispenser. There are 2 basic designs, a semi-automatic one that requires the player to stand and plant the crops and a fully automatic one that uses villagers to do the work for you.
The farm shown in impulseSV’s Farm Design video does not work anymore as of 1.13, but with a workaround it still gets the job done. See the images to the right.
ImpulseSV’s farm design
Embedded media: //www.youtube.com/embed/YGDQ_mPhC2c?
This is a semi-automatic design suitable for all types of crops.
Frilioth’s 1.14.4 potato, carrot, and wheat farm design
Embedded media: //www.youtube.com/embed/9oSmeAomUZ4?
This design uses a villager wearing a straw hat to plant and harvest carrots, potatoes, or wheat
Mikecraft’s farm design
Embedded media: //www.youtube.com/embed/Q_TyNK2g4r4?
This design is slower than others, but it doesn’t require the player to manually plant seeds.
Semi-automatic farming
There are ways to harvest crops semi-automatically.
- Most common is water: Flowing water breaks crops, and produces their usual drops. This can be used to harvest crops semi-automatically, and carry the resulting items to some central location such as a hopper. A water flood does not revert farmland back into dirt.
- Sticky pistons can be used to move the farmland block itself, breaking the crop without reverting the farmland to dirt. Water currents for collecting the items can be placed under the farmland rather than beside it, making this method more compact than harvesting directly with pistons. A pair of pistons, appropriately clocked, could be used to shift an entire row of farmland.
- Crops are also broken when directly pushed by pistons, with the usual drops. Unfortunately, this reverts the farmland back into dirt, so that it needs to be re-tilled after every harvest, rather defeating the point of automation.
Automatic harvesting is generally an all-or-nothing business – harvesting every plant regardless of whether it is mature. In this situation, it is best not to wait for every last plant to finish growing, as there are always a few that take much longer than normal. The optimal time to harvest wheat in particular turns out to be when 80% (4⁄5) of the plants have matured, and this is at least acceptable for carrots and potatoes. Assuming that the field is immediately replanted, harvesting at this time results in the greatest overall rate of production, along with a surplus of seeds for wheat. The section on growth rates gives the optimum harvesting time in minutes for some common planting arrangements.
Because bonemeal can force crops to grow more quickly—ignoring normal concerns like growth rate or ambient light—it can be used to create large amounts of wheat or other crops quickly. A number of farm designs focus on using bonemeal exclusively, sacrificing volume and growth efficiency for speed/ease of planting and harvesting. An example which takes advantage of the inventory mechanics to minimize the time required to plant and harvest can be seen here:
Embedded media: //www.youtube.com/embed/fCmfr9qamG4?
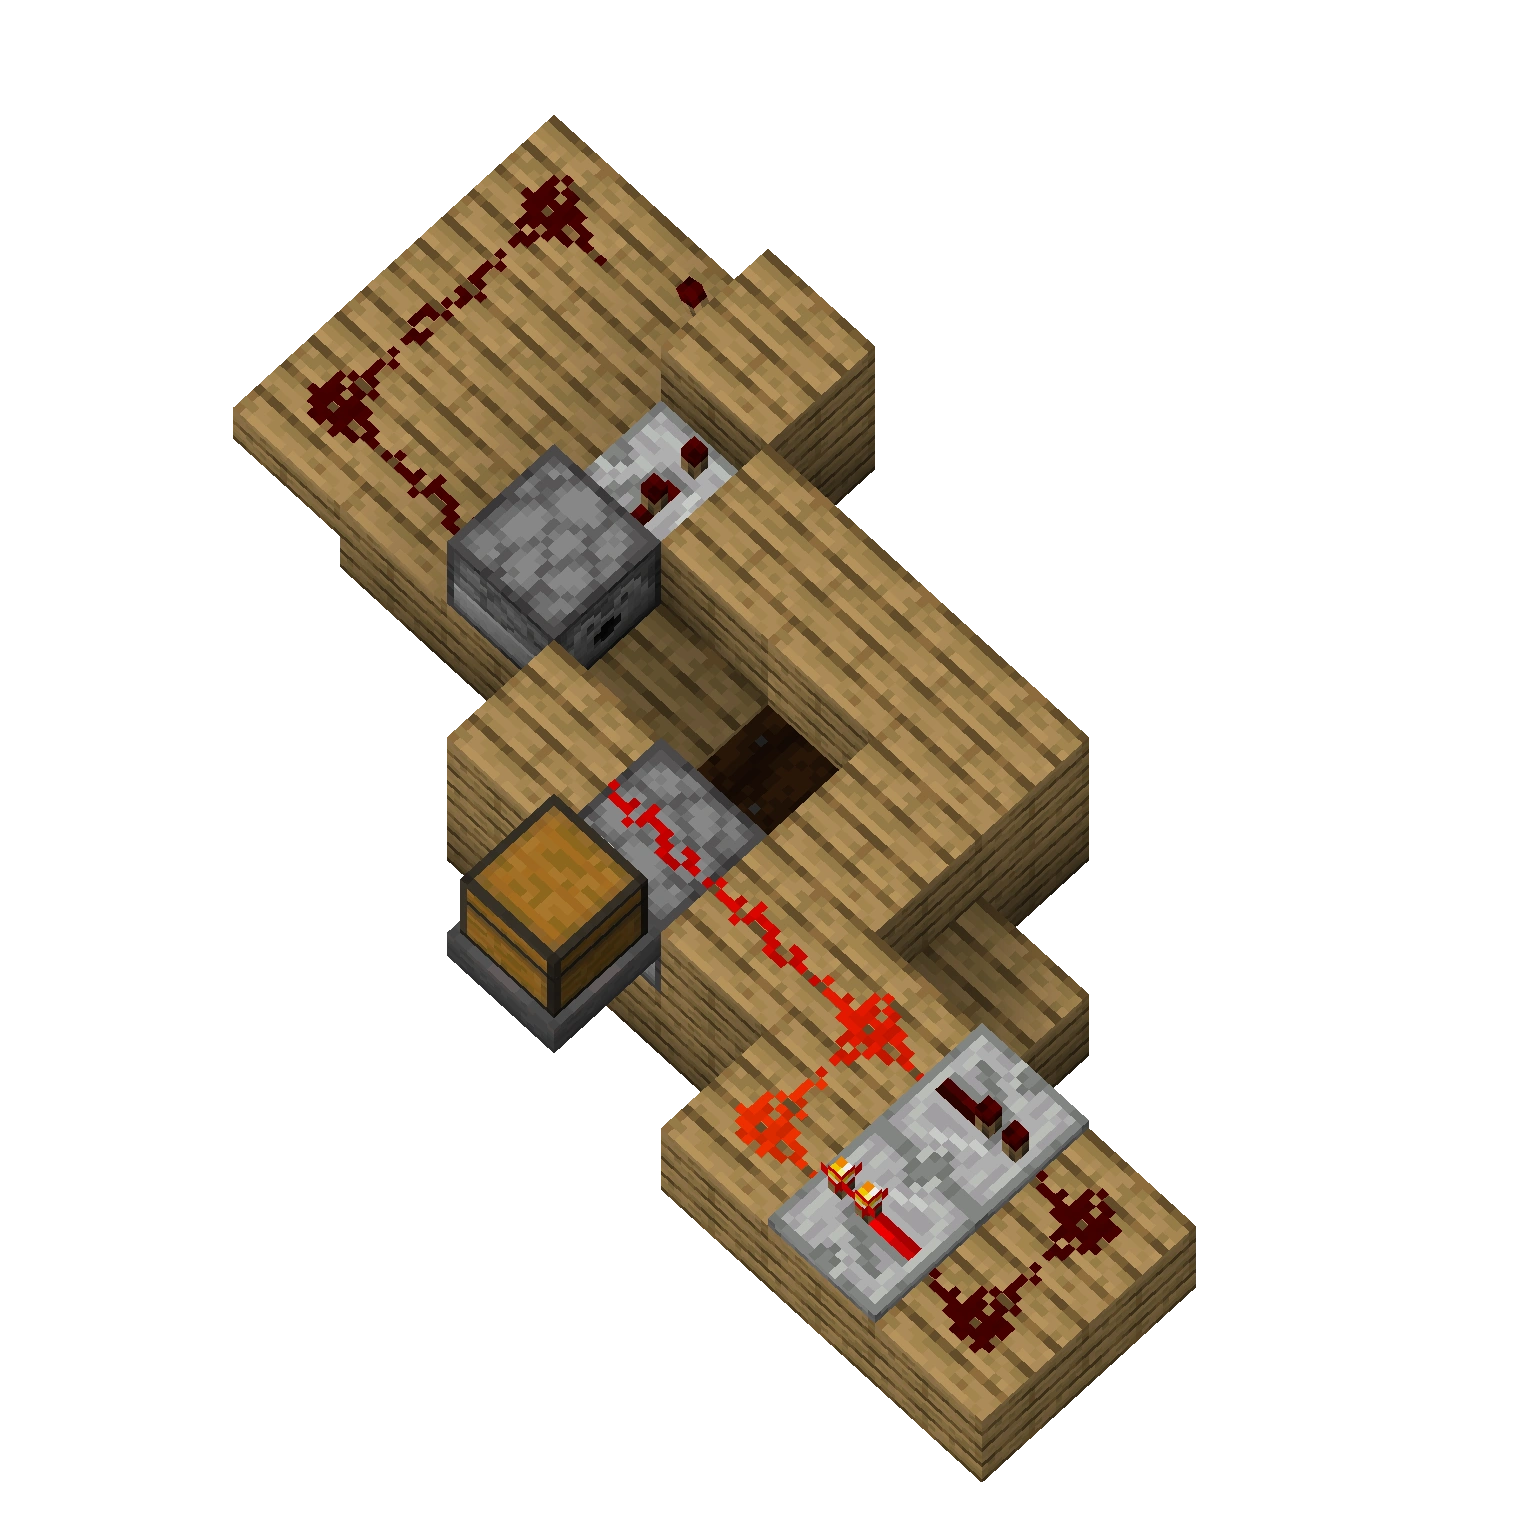
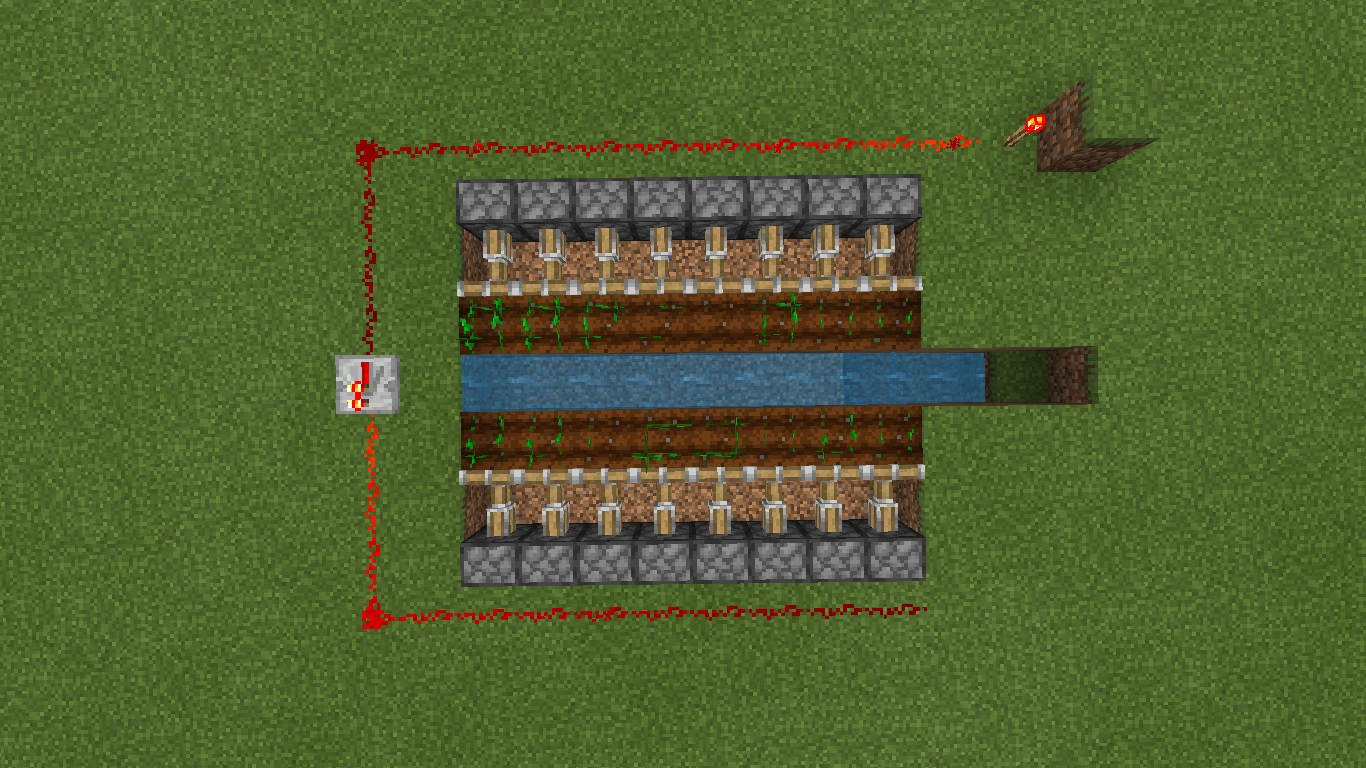
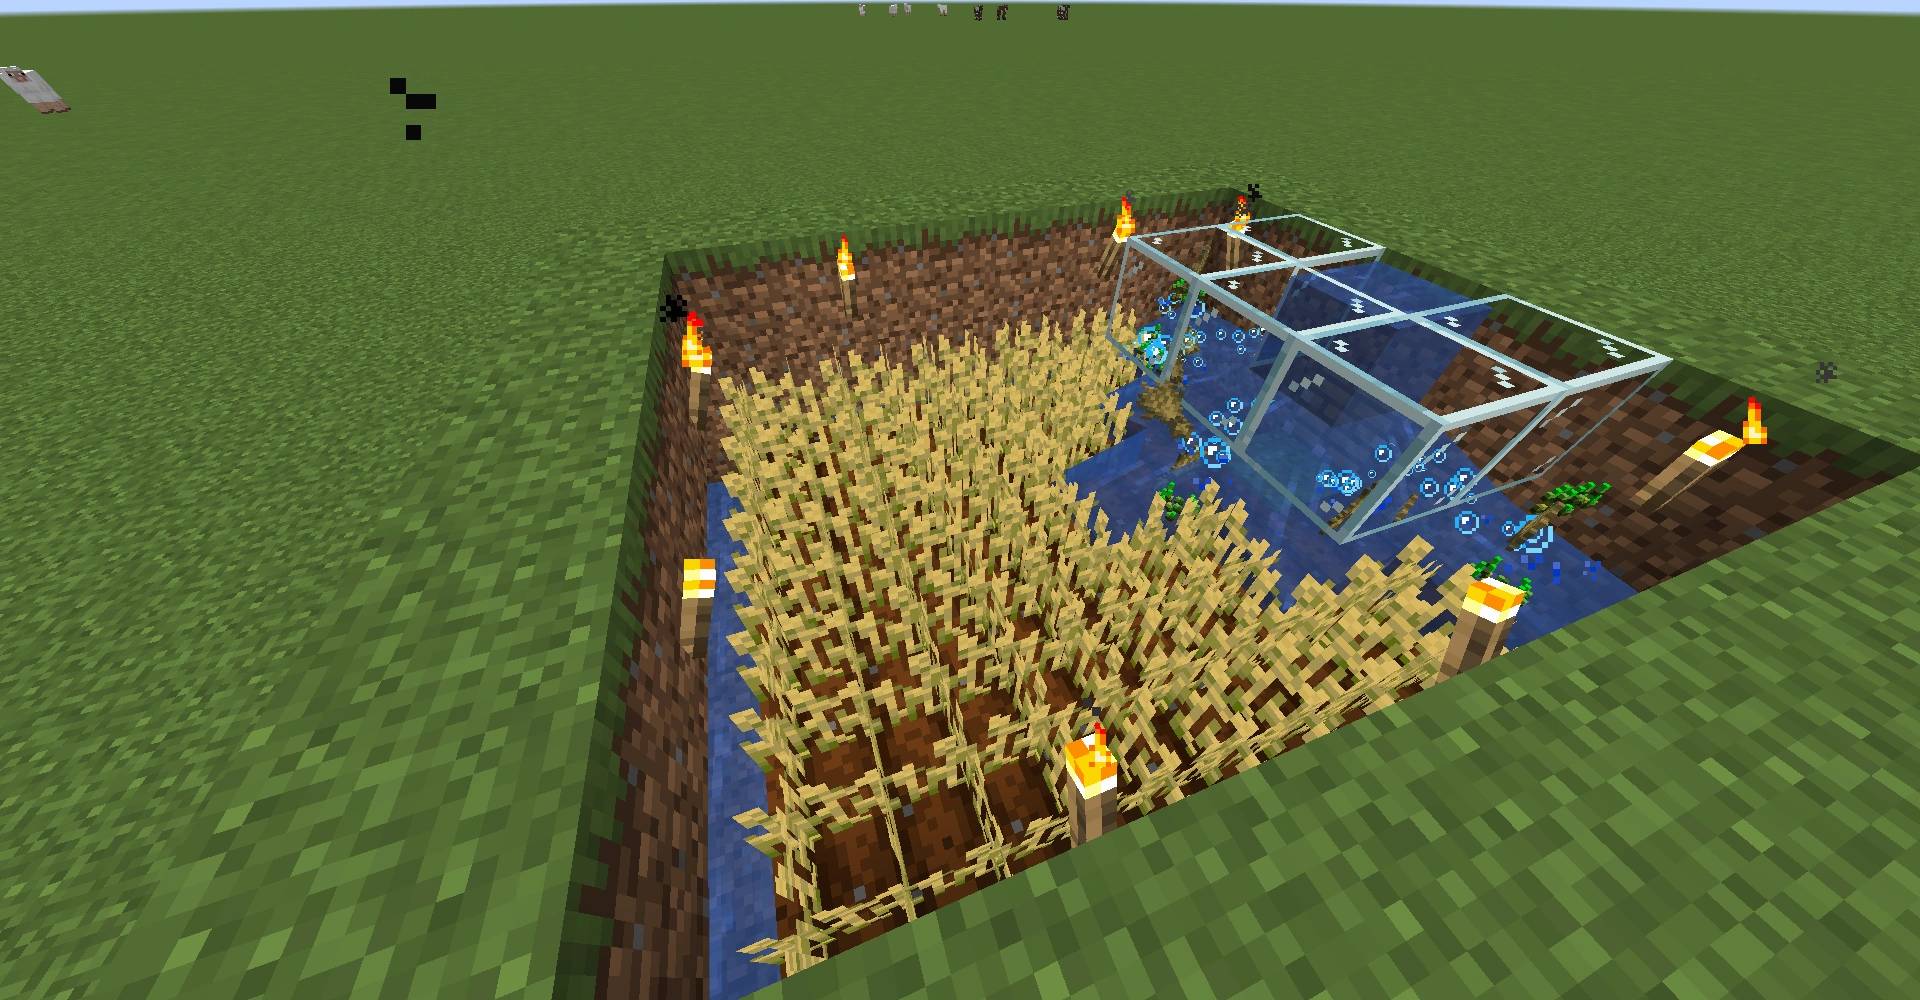
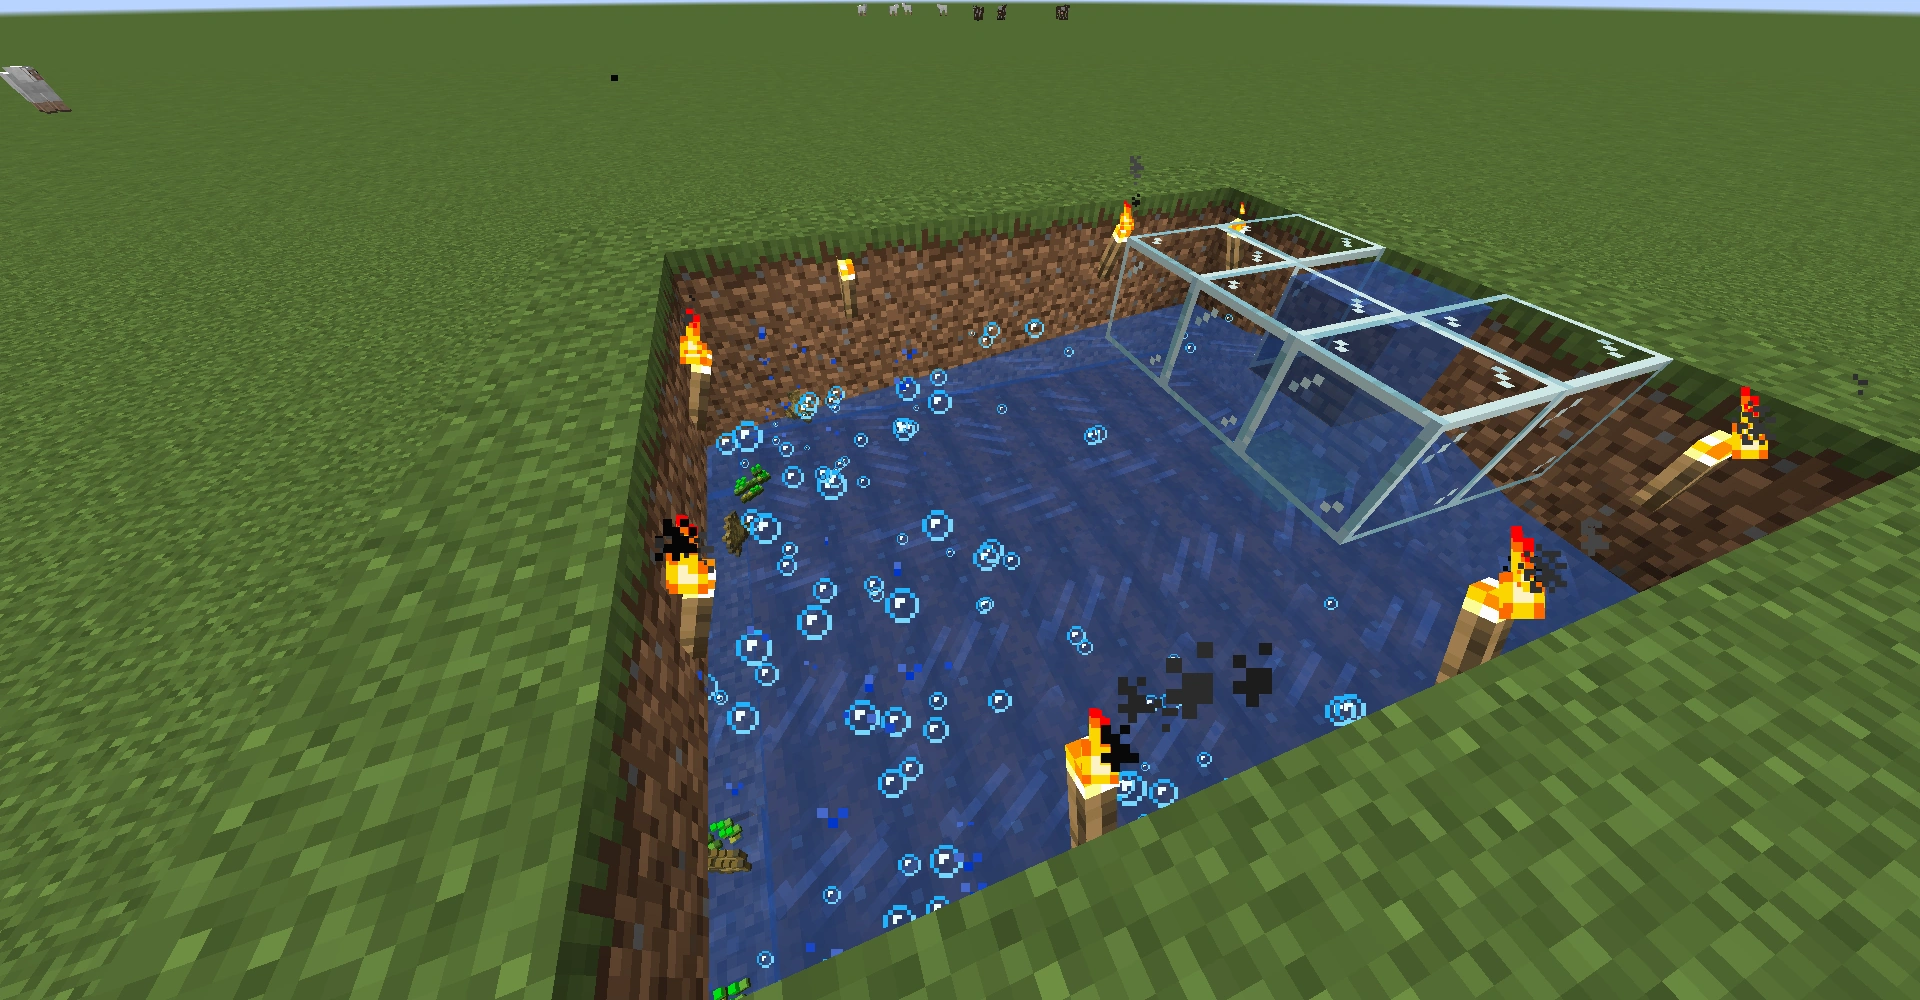
Flooded-cell farm
This farm is divided into cells of 29 plants, where each cell is flooded individually by a single piston and water block (or bucket-bearing dispenser). The drops are washed into a stream, gathering them to a single point.
There’s a stream of water in the center of the farm, which needs to go down 1 block every 8 blocks toward a collection point. This can be mirrored on the other side of the collection point, to cut the total depth needed.
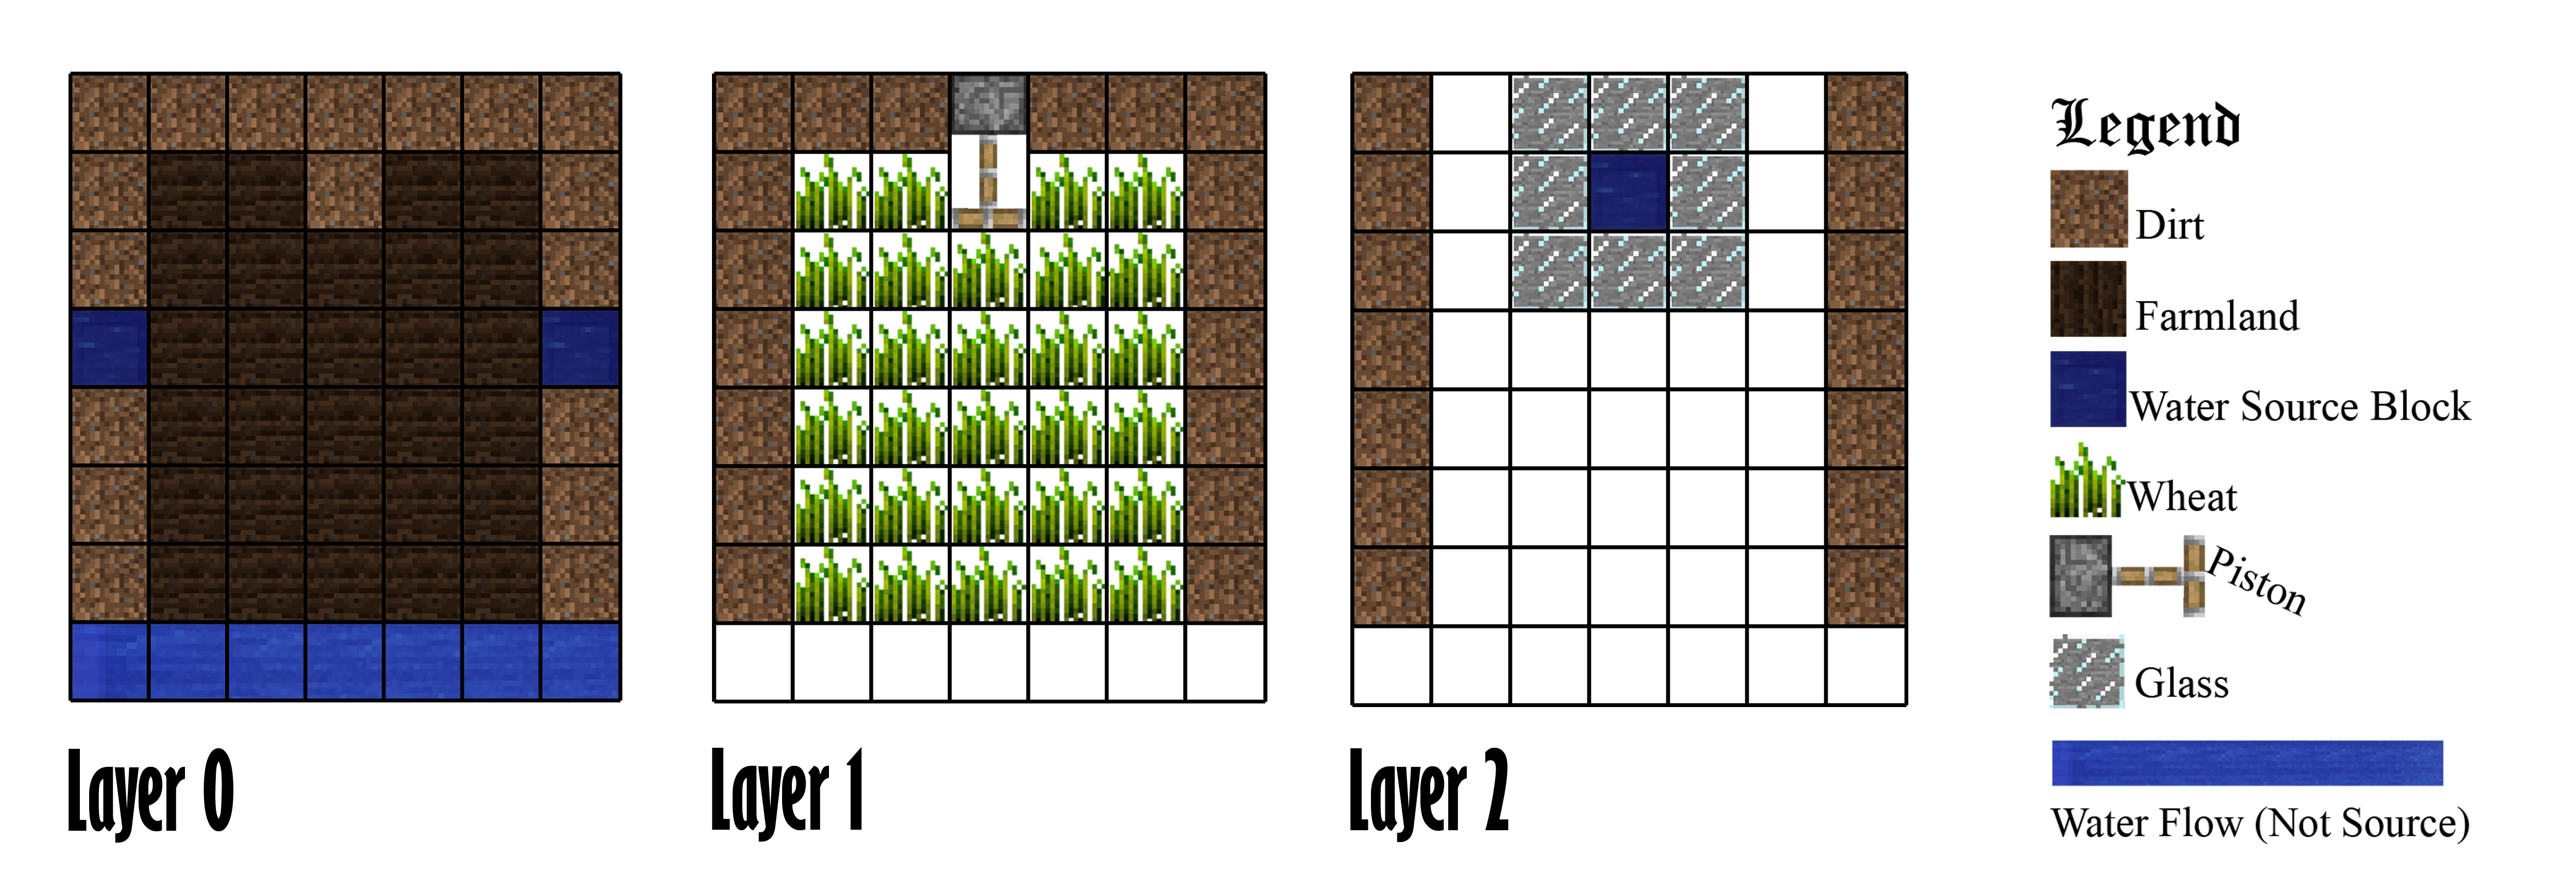
On one or both sides of the stream are farming cells. The cells are separated from each other with two block high walls. If a 1-block high wall or fencing is used, some of the drops may fall onto the barrier and out of the flow. Under every wall separating the cells from each other is a source block of water, to hydrate the farmland on both sides of the wall.
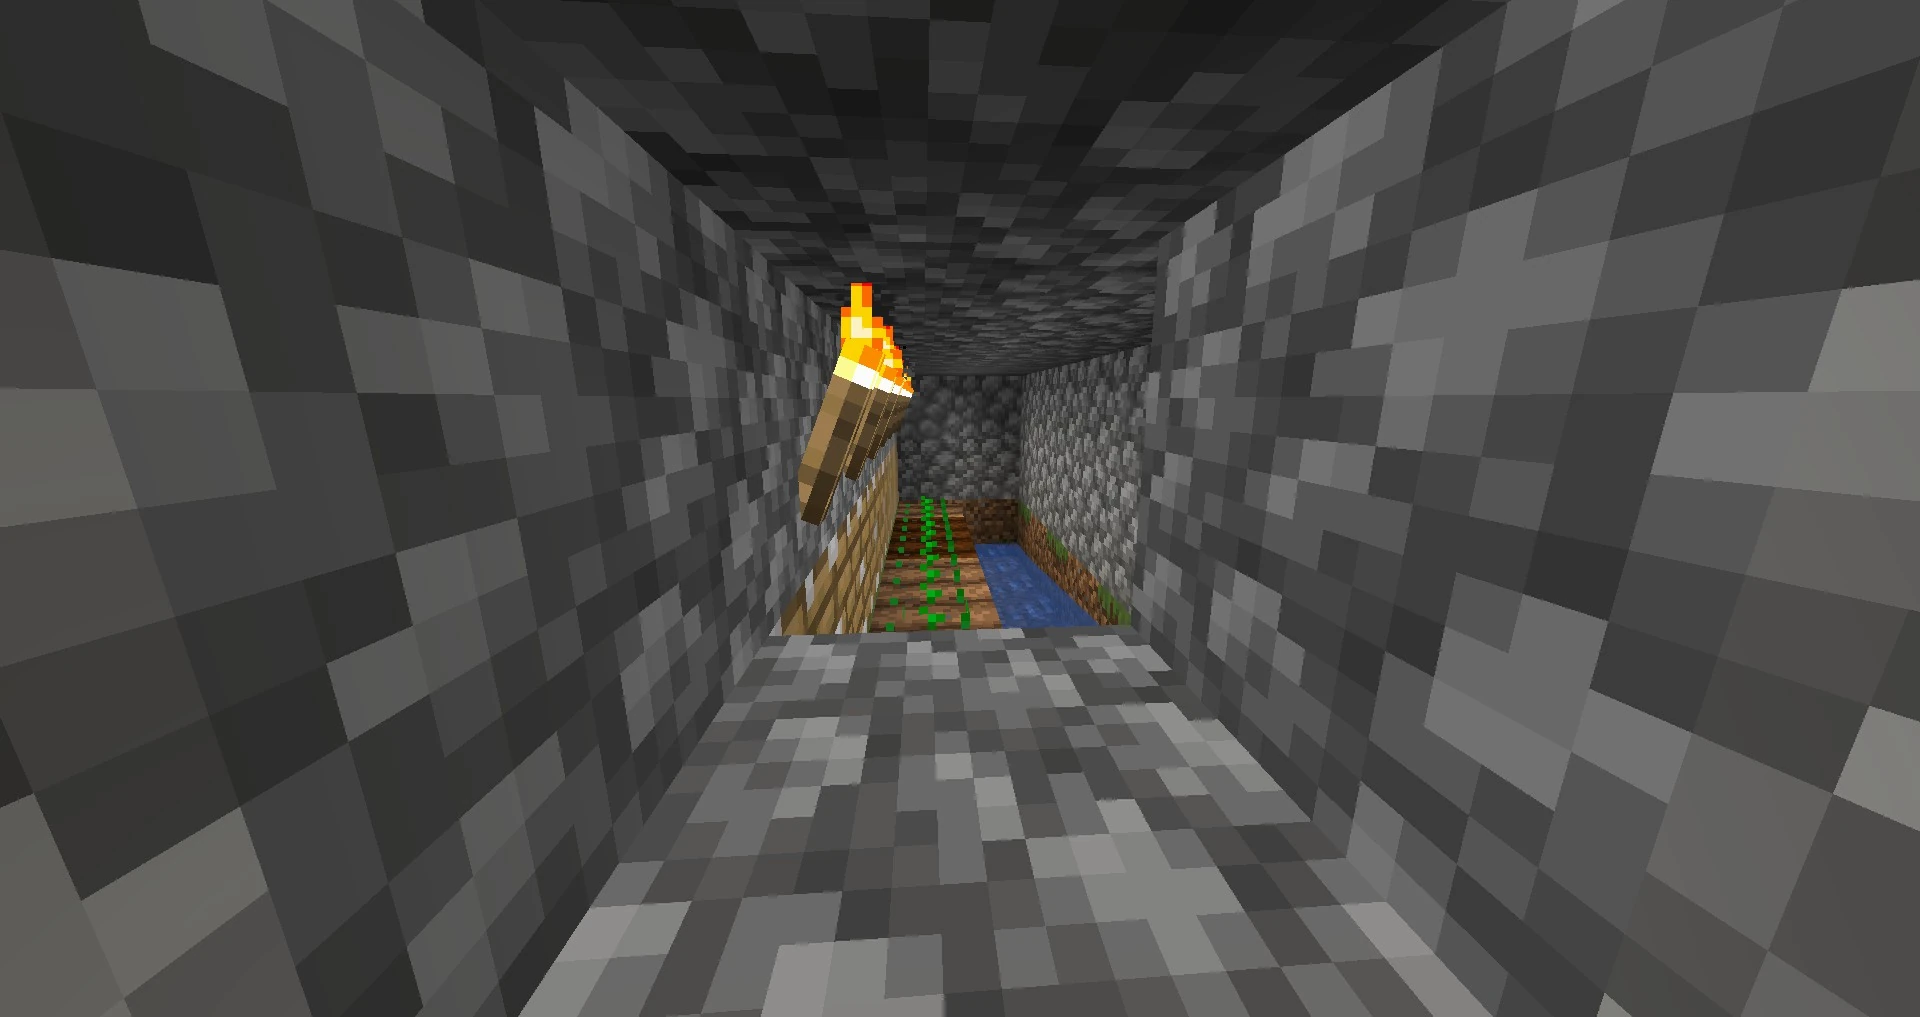
The design as shown uses a piston to control the flow of water. The piston is normally extended. Above the extended piston shaft is a water source block, surrounded by 8 (or even 4) glass blocks or panes. Glass is needed so that light goes through the plants. When the switch is turned off, the piston retracts and the water flows through.
The piston setup can be replaced with a dispenser containing a bucket of water and using a button instead of a lever for the switch. Either way, the pistons or dispensers should be wired together behind the cells with repeaters as needed, to allow triggering them from some central point.
When released, the water harvests the crops and washes them into the stream. At the end of the stream, you can collect your drops, or place a hopper to do it for you.
Simple flooding farm without dispensers or pistons
Embedded media: //www.youtube.com/embed/J-VVT5u2YWA?
Fully automatic farming
Fully-automatic farms can be constructed using Farmer villagers to replant the crops. Three general designs are possible:
- Since seeds aren’t food, a villager with an inventory full of seeds continues to harvest and replant crops, but cannot pick up the resulting wheat or beetroots. Hoppers or hopper minecarts below the farmland can collect the crops, while allowing the villager to replant the crop.
- For carrots and potatoes, a villager replants the field, but stops harvesting once he has enough food in his inventory. A redstone mechanism timed to the growth rate of the crops is used to periodically pour water over the farmland to wash the crops into a collection system.
- For carrots, potatoes, beetroots or bread, a second villager with empty inventory may be placed nearby such that the farmer attempts to share food, but the throws cannot reach the second villager. Or the second villager may have an inventory full of seeds (or wheat for non-farmers) so he cannot pick up any food. Hoppers placed where the thrown food lands can collect the thrown food.
(Note: Bread doesn’t work due to MC-204073)
In all cases, the farm must be entirely within the bounds of a village or must be more than 32 blocks away from the outer boundary of any village. Otherwise the villager attempts to make his way to the nearby village instead of tending the crops.
